re-stringing an acoustic with bridge pins
Re-stringing an acoustic guitar well can make all the difference to its tuning stability and to the way it sounds. This blog relates specifically to acoustic guitars with bridge pins. We will focus on the end of the string that goes through the bridge.
The basics
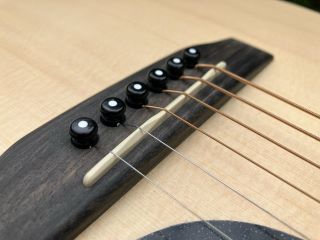
Acoustic guitar bridges are usually glued to the top of the guitar. They have six holes behind the saddle that extend through the bridge into the body of the guitar.
The guitar string is placed through this hole, into the body. The bridge pin is slotted into the hole with it to hold the string in place.
Bridge pins have a slot in them on one side, in which the string sits, and they usually have a flat bottom.
You sit the string in this slot with the ball end of the string at the bottom end of the pin, then insert the pin into the bridge pulling up on the string as you do so.
A common mistake
Inside your acoustic guitar, there is a ‘bridge plate’ on the underside of the guitar top. It extends across the six holes coming down from the bridge.
When a string is correctly installed, the ball end of the string should be pulled up against the bridge plate. You achieve this by pulling up on the string (from outside the guitar) while inserting the pin into its hole.
However, it is easy for the ball end of the string to remain stuck at the foot of the bridge pin, or to lie halfway up the pin but not fully against the bridge plate. You cannot easily see whether this is the case from your position outside the guitar.
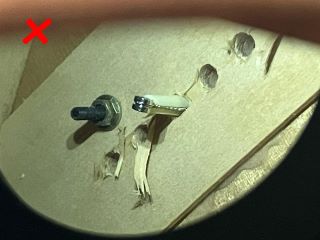
This is problematic because once the guitar is tuned to pitch and you start playing, the string can gradually slip up the pin causing that string to go out of tune.
If the ball end of the string remains stuck at the foot of the bridge pin the force of the string tension can also cause the pin to develop a split. Split bridge pins need to be repaired or replaced.
3 ways to avoid this problem
Here are 3 great tips to avoid the problem above:
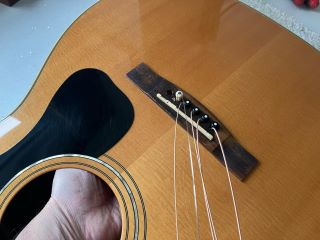
1. Fit all six strings at the bridge first, before winding any of them around the tuner pegs. This allows you to reach your hand through the soundhole, into the guitar, and locate the ball end of the string as you push the pin into its hole.
This will help you ensure that the ball end’s final position is where it should be, up against the bridge plate, and not stuck at the bottom of the bridge pin or halfway up. If you wrap each string around its tuning peg as you go you won’t be able to reach inside to do this.
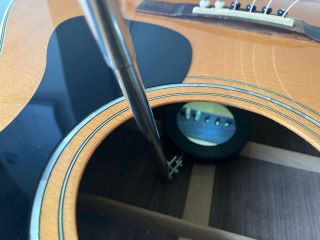
2. A good investment that won’t break the bank is an inspection mirror with a light. You can pick one up online for around £10.
This allows you to actually see the strings and pins inside the guitar body. It's a great way to catch any problems before you tune up your guitar. Simple but effective.
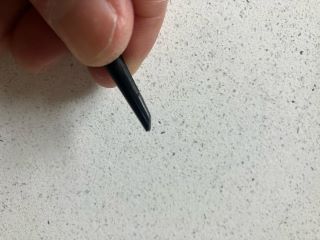
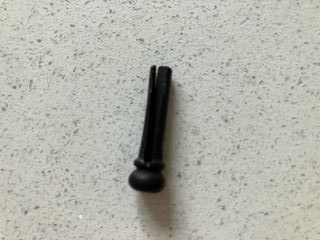
3. A good solution to the ‘ball end stuck at the end of its pin’ problem is to file the end of each bridge pin at an angle, instead of leaving it at 90 degrees. This forces the ball end of the string to slip up the pin as you pull on it and will encourage it to settle in its correct position.
Aim for an angle of about 50-55 degrees (it doesn't have to be exact). If you have plastic bridge pins, you can create the angle using sandpaper. If your pins are made of a tougher material, like bone, use a small file. After filing, tidy up the edges with sandpaper.
(This last modification is not recommended on vintage instruments that you want to keep in their original state, unless you remove the original pins first and perform this modification on a new set of pins).
Wondering if it’s time to change your strings? Check out our blog on when to change guitar strings.
WE SET UP ACOUSTIC GUITARS
If your acoustic hasn't been given the once over in a while, speak to us about giving it the makeover it deserves.
See our setups page to find out more.